Step-by-step instructions on how Russians can independently obtain a visa to Italy in 2021. What documents to prepare for a C visa, prices and details of registration. Find out why some tourists are denied visas.
Attention: at the moment, tourist visas are not issued, the exception is for family reasons, that is, for close relatives of EU citizens and close relatives of third-country nationals who have a residence permit in Italy. Read more about the conditions on the website of the Italian Visa Application Center.
What kind of visa is issued for a tourist trip
To visit Italy, you need to apply for a Schengen visa. There are several types of visas. With a transit visa A, you are allowed to cross the Italian border, but you cannot go from the airport to the city. With a B visa, you can stay in the country for 5 days.
Most tourists apply for a C visa. With it, you can enter the country several times and stay here for up to 90 days every six months. Such visas are single-entry and multiple-entry (multi).
Step 1: Book your tickets
Need to book round-trip air tickets. You should not draw tickets in Photoshop - if a fake is found, you will not only get a refusal, but also be blacklisted.
There are ways to get a reservation without paying. The agent.ru search engine allows you to keep a reservation for free for 3-7 days, and it will be displayed on the airline's website and third-party sites. However, agent.ru often cancels bookings without giving any reason.
Also, when buying tickets from Aeroflot, you can choose a cash payment method, and your reservation will hang for 24 hours. Another way is to pay for the reservation retention service on the airlines' websites. Two or three days of waiting will cost 500-1000 rubles.
If you do not like the proposed options, purchase a return ticket for Skyscaner or Aviasales and cancel it if you receive a refusal. Losses in money will be minimal!
Step 2: Book your accommodation
To obtain a visa to Italy in 2021, hotel reservations will be required. They should cover all nights during your trip. The Italian Consulate willingly accepts hotel reservations made with Booking, as well as apartments and apartments with Airbnb. Indicate the names of tourists in Latin!
Booking has a lot of hotel offers with free cancellation. Italians do not monitor the cancellation of the reservation after the visa is issued, so there will be no problems.

Step 3: make copies of passports
Your passport must end no earlier than 90 days after the end of the trip. Take copies of the pages with personal data and photograph from a valid foreign passport, your old passports and copies of all pages of your civil passport. Remove the documents from the covers and make copies on A4 paper - two spreads per sheet.
Step 4: buy insurance
To obtain a visa to Italy, you need to take out medical insurance with a minimum coverage of 30,000 euros. You can choose any package - "standard", "extended", "family" or "group". It is convenient to take out insurance on the Cherehapa website.

Step 5: Get help from work
Take a certificate on letterhead, which will record your position, salary and the fact that you have been granted leave for the duration of the trip. This document must be signed by the director and chief accountant.
Students prepare a student card and a certificate signed by the dean, schoolchildren - a certificate certified by the school director, and pensioners - the original and a copy of the pension certificate.
Individual entrepreneurs need a copy of the IP registration certificate and the original of the tax registration certificate. In the questionnaire you need to write individual entrepreneur.
Step 6: Get a bank statement
Financial solvency is one of the important points of obtaining a visa to Italy. Take a certificate from the bank with a "wet" seal, which will indicate the movement of money in the account for the last 3 months. An original and a copy of a passbook will do. The account must have funds in the amount of at least 50 euros per person per day.
If you are a freelancer with a registered individual entrepreneur, get a certificate from the tax office that you have sufficient profit, or attach an extract from your personal bank account. Freelancers should show their financial viability - the more money in the account, the better.
For minors and a non-working spouse, a sponsorship letter from parents and husband, as well as documents that prove their income, will be required.
For adult men who are temporarily unemployed, a sponsorship letter will not work. The visa officer will be suspicious of him. Take your bank statement. The more money there is, the better.
Step 7: Take a photo
For a visa to Italy, you will need a photo in which you are shown without glasses, headgear and headphones. The color photograph on a white background measuring 45 mm by 35 mm must have been taken recently - within the last 6 months. The head should occupy 70-80% of the photo area.

Step 8: fill out the form
To obtain a visa to Italy, applicants fill out a special form. It is convenient to download it in PDF format and then fill it out with a ballpoint pen with blue paste. You can fill out the form online.
Make all entries in large block letters in Latin. In clause 6 about the country of birth, everyone who has USSR in their passport writes USSR. In clause number 19 "professional activity", freelancers write freelancer, non-working - non employed, and pensioners - retired.
The questionnaire has 4 pages. Print it on two sheets of paper on both sides. If, when filling out online, it is not possible to put a checkmark in the necessary places, put them down manually after the questionnaire is printed.

Step 9: make an appointment
The Italian Embassy in Moscow operates at 5 Denezhny Pereulok, and the Consulate General at 10 Yakimanskaya Embankment. The Consulate General in St. Petersburg is located at 10 Teatralnaya Square. The visa section of the Embassy holds a reception on weekdays from 9:00 to 13:00 and from 14:00 to 17:00.
To submit documents yourself through the consulate, register on the website, select free days in the calendar and sign up for the date that suits you. Additionally, you can enter three more applicants - your family members. The registration takes place 8 weeks in advance. You will receive a reminder letter 10 days before your visit.
To make things easier, many people prefer to submit packages of documents through the visa center. It is recorded in 90 days. There are visa centers in Moscow, Chelyabinsk, St. Petersburg, Yekaterinburg, Novosibirsk and Krasnodar.
Step 10: Submit documents and biometrics
On the day of submission, you must take your fingerprints and take a digital photo. This is a must for all tourists over 12 years old. Personal information will be retained for 5 years.
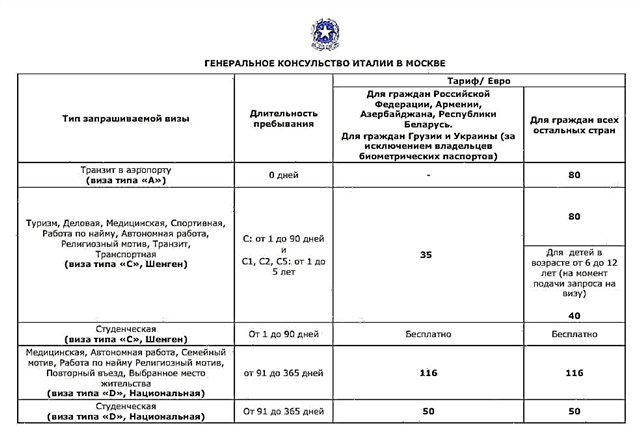
Payment is taken directly at the visa center. The consular fee for a regular visa is 35 euros, and an express visa is 70 euros. The service fee is 2200 rubles. Children under 6 years old are issued a C visa free of charge, but a service fee is charged from everyone who applies.

Step 11: Get your visa
Usually, documents are completed in 4 days. In high season, the wait stretches up to two weeks. At the embassy, passports are issued on Fridays from 14:00 to 17:00. Want to get faster? Pay for the shipment, and your passport with a visa will come to the address you specified.
Refusals in a visa to Italy
Approximately 5-10% of applicants are refused. The most common reasons for refusal:
- unclear purpose of the trip to Italy
- incomplete package of documents
- unreliability of data
- little money on the account
- past visa violations.
When you get a rejection, the reason is encoded in symbols. If C1 is written, then you can safely submit documents again. If C2 refuses, the applicant is invited for an additional interview with the consul. Remark C3 means that you need to convey the documents.You can sympathize with those who got C4! These tourists are permanently banned from entering all EU countries.


